So I’ve decided to come back to writing about my periodic forays into coding, and I wanted to see if I can make some actual progress this time. A good place to start is to share my experience in setting up the environment in my Windows system for developing in Python using Django.
I’ve been doing my (on/off) tinkering with development on Windows Subsystem for Linux (WSL), and I must say that Windows has come a long way from the days where dual booting was required for Linux and Windows to co-exist. While it’s not perfect, WSL certainly makes it much easier to have my development environment in Windows, and I want to share a little bit about how I set this up.
Installing WSL
This entire part is pretty well documented by Microsoft. Still, for completeness, I’ve documented the steps here as well.
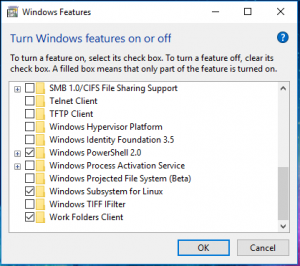
First, in Windows 10, search for the “Turn Windows features on or off” function in the Control Panel. This opens up a window and you can check the box next to the folder for “Windows Subsystem for Linux”. Click on “Ok”. 
Alternatively, you can use this script from Windows Powershell with Administrator rights:
Enable-WindowsOptionalFeature -Online -FeatureName Microsoft-Windows-Subsystem-LinuxThis will likely prompt you to reboot your computer so let it reboot.
Once back into Windows, open the Microsoft Store and search for Linux. You can see there will be a few distributions (flavours) of Linux you can select. I chose Ubuntu. Click on the App, then click on Install.
Once installed, it needs to be initialized once, which you can access directly from the Windows Start menu. Just click on the app you installed just like every other app. You only need to do this once. Again, instructions are available on Microsoft Docs, but I will step through this very quickly.
Launching the WSL app of choice will typically open up a terminal (bash). The first thing they will prompt you is to create a Linux user account. Since WSL works entirely separate from Windows, you don’t have to use the same user ID as in Windows, and this can be set as you wish. It will also prompt you for a password twice.
Once done, it would be best to quickly update your WSL, and you do this by keying in the following command:
sudo apt update && sudo apt upgradeThis concludes the setup.
Python and Virtual Environment
One of the things I learnt about Python is that there are many variations in installation. It comes by default in Linux based OSes, like MacOS or Ubuntu, but needs to be separately installed for Windows. And then there are versions, with a lot of people still doing development on Python 2 even though Python 3 is the latest version. It’s worth noting that there are differences in the environment setup for the two, and you can even install BOTH at the same time in one OS. This is why I said there are many variations to the installation.
I searched for quite a number of resources to learn how to set this up, and one of the best articles on this is on the Mozilla Developer Network. You can check it out here.
Since we are using WSL, we will need to set it up there rather than in Windows. It probably already has some version of Python installed, and maybe even more than one. It’s a good idea to check this:
python -Vand
python3 -VIf it is installed, it will display the version. I would recommend at this point to use Python 3 as it’s the latest version.
Next step, is to install pip which is the Python Package Installer.
sudo apt install python3-pipNow that we have pip installed, it’s time to setup the rest of the environment. Bear in mind the complications I mentioned above on various versions of Python and OSes, so it is recommended to always use a virtual environment setup in developing. Install it by using pip3 like this:
sudo pip3 install virtualenvwrapperNow you will need to modify the .bashrc file (which sets up the options for bash and can be used to create shortcuts). We do this to complete the installation of virtual environment, allowing you to use this in the folder you are working on. The .bashrc file is typically located in the home folder (/home/username). Since WSL automatically puts you in Windows folders, you can quickly jump to it by using the following:
cd ~It is not recommended to access and modify Linux files via Windows, so we will use the built in text editor to modify the .bashrc file. Use:
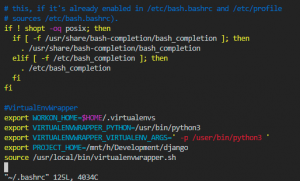
vim .bashrcThis launches Vim in the terminal window. Press the “down” arrow key until you hit the end of the file. Press “i” so that you can insert the text, move to the end of the last line, press “Enter” to create a new line. Then paste the following code with CTRL-V:
#VirtualEnvWrapper
export WORKON_HOME=$HOME/.virtualenvs
export VIRTUALENVWRAPPER_PYTHON=/usr/bin/python3
export VIRTUALENVWRAPPER_VIRTUALENV_ARGS=' -p /usr/bin/python3 '
export PROJECT_HOME=/mnt/c/development
source /usr/local/bin/virtualenvwrapper.sh
Do note that you should replace PROJECT_HOME value to the windows folder where you will be putting your development projects in. In the case above, it is in C:\development.

Double check everything, and then press “ESC” to exit the “Insert mode” in Vim. The Insert word will disappear. Then type “:x” to quit Vim. It automatically saves the file.
Now we need to re-initialize .bashrc:
source ~/.bashrcThis loads a bunch of stuff and gets bash ready. Now you can navigate to your working directory (again, I recommend /mnt/c/development/django or something similar) and create a virtual environment (you can name it what you want).
mkvirtualenv my_django_environmentThe command automatically creates the virtual environment and activates it. You will be able to notice this the bracketed environment name at the start of the bash prompt (left hand side).
Every time you start working on your development, you should activate the Virtual Environment first. You can practice / note these commands:
deactivate— Exit out of the current Python virtual environmentworkon— List available virtual environmentsworkon name_of_environment— Activate the specified Python virtual environmentrmvirtualenv name_of_environment— Remove the specified environment.
Essentially, the two key ones are “workon” and “deactivate”. It is important to always be working on the correct Virtual Environment.
Installing Django
Now that we have setup Python and Virtual Environment, we can proceed to install Django. Do note, we do not install Django without first activating the Virtual Environment.
pip3 install djangoThat’s it. Now, let’s see if we can start a Django project. In this case, we use new_django_project as the folder where we store project files, and mydjangosite as the project name, but you can change it to anything you want.
mkdir new_django_project
cd new_django_project
django-admin startproject mydjangosite
cd mydjangosite
python3 manage.py runserver
That’s it, now we have setup Python and Django and we are ready to start building something great!
