(Re) Learning how to code in Python with Django – Part 1: Setting up my dev environment

So I’ve decided to come back to writing about my periodic forays into coding, and I wanted to see if I can make some actual progress this time. A good place to start is to share my experience in setting up the environment in my Windows system for developing in Python using Django.

I’ve been doing my (on/off) tinkering with development on Windows Subsystem for Linux (WSL), and I must say that Windows has come a long way from the days where dual booting was required for Linux and Windows to co-exist. While it’s not perfect, WSL certainly makes it much easier to have my development environment in Windows, and I want to share a little bit about how I set this up.

Installing WSL

This entire part is pretty well documented by Microsoft. Still, for completeness, I’ve documented the steps here as well.

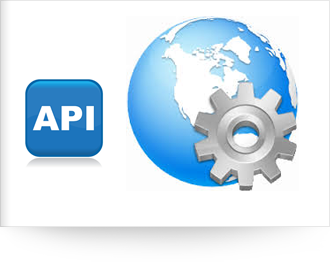
First, in Windows 10, search for the “Turn Windows features on or off” function in the Control Panel. This opens up a window and you can check the box next to the folder for “Windows Subsystem for Linux”. Click on “Ok”.

Alternatively, you can use this script from Windows Powershell with Administrator rights:

Enable-WindowsOptionalFeature -Online -FeatureName Microsoft-Windows-Subsystem-Linux

This will likely prompt you to reboot your computer so let it reboot.

Once back into Windows, open the Microsoft Store and search for Linux. You can see there will be a few distributions (flavours) of Linux you can select. I chose Ubuntu. Click on the App, then click on Install.

Once installed, it needs to be initialized once, which you can access directly from the Windows Start menu. Just click on the app you installed just like every other app. You only need to do this once. Again, instructions are available on Microsoft Docs, but I will step through this very quickly.

Launching the WSL app of choice will typically open up a terminal (bash). The first thing they will prompt you is to create a Linux user account. Since WSL works entirely separate from Windows, you don’t have to use the same user ID as in Windows, and this can be set as you wish. It will also prompt you for a password twice.

Once done, it would be best to quickly update your WSL, and you do this by keying in the following command:

sudo apt update && sudo apt upgrade

This concludes the setup.

Python and Virtual Environment

One of the things I learnt about Python is that there are many variations in installation. It comes by default in Linux based OSes, like MacOS or Ubuntu, but needs to be separately installed for Windows. And then there are versions, with a lot of people still doing development on Python 2 even though Python 3 is the latest version. It’s worth noting that there are differences in the environment setup for the two, and you can even install BOTH at the same time in one OS. This is why I said there are many variations to the installation.

I searched for quite a number of resources to learn how to set this up, and one of the best articles on this is on the Mozilla Developer Network. You can check it out here.

Since we are using WSL, we will need to set it up there rather than in Windows. It probably already has some version of Python installed, and maybe even more than one. It’s a good idea to check this:

python -V

and

python3 -V

If it is installed, it will display the version. I would recommend at this point to use Python 3 as it’s the latest version.

Next step, is to install pip which is the Python Package Installer.

sudo apt install python3-pip

Now that we have pip installed, it’s time to setup the rest of the environment. Bear in mind the complications I mentioned above on various versions of Python and OSes, so it is recommended to always use a virtual environment setup in developing. Install it by using pip3 like this:

sudo pip3 install virtualenvwrapper

Now you will need to modify the .bashrc file (which sets up the options for bash and can be used to create shortcuts). We do this to complete the installation of virtual environment, allowing you to use this in the folder you are working on. The .bashrc file is typically located in the home folder (/home/username). Since WSL automatically puts you in Windows folders, you can quickly jump to it by using the following:

cd ~

It is not recommended to access and modify Linux files via Windows, so we will use the built in text editor to modify the .bashrc file. Use:
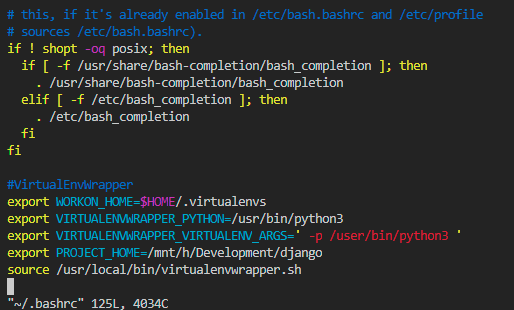
vim .bashrc

This launches Vim in the terminal window. Press the “down” arrow key until you hit the end of the file. Press “i” so that you can insert the text, move to the end of the last line, press “Enter” to create a new line. Then paste the following code with CTRL-V:

#VirtualEnvWrapper
export WORKON_HOME=$HOME/.virtualenvs
export VIRTUALENVWRAPPER_PYTHON=/usr/bin/python3
export VIRTUALENVWRAPPER_VIRTUALENV_ARGS=' -p /usr/bin/python3 '
export PROJECT_HOME=/mnt/c/development
source /usr/local/bin/virtualenvwrapper.sh

Do note that you should replace PROJECT_HOME value to the windows folder where you will be putting your development projects in. In the case above, it is in C:\development.

Using Vim to complete Virtualenv install.

Double check everything, and then press “ESC” to exit the “Insert mode” in Vim. The Insert word will disappear. Then type “:x” to quit Vim. It automatically saves the file.

Now we need to re-initialize .bashrc:

source ~/.bashrc

This loads a bunch of stuff and gets bash ready. Now you can navigate to your working directory (again, I recommend /mnt/c/development/django or something similar) and create a virtual environment (you can name it what you want).

mkvirtualenv my_django_environment

The command automatically creates the virtual environment and activates it. You will be able to notice this the bracketed environment name at the start of the bash prompt (left hand side).

Every time you start working on your development, you should activate the Virtual Environment first. You can practice / note these commands:

  • deactivate — Exit out of the current Python virtual environment
  • workon — List available virtual environments
  • workon name_of_environment — Activate the specified Python virtual environment
  • rmvirtualenv name_of_environment — Remove the specified environment.

Essentially, the two key ones are “workon” and “deactivate”. It is important to always be working on the correct Virtual Environment.

Installing Django

Now that we have setup Python and Virtual Environment, we can proceed to install Django. Do note, we do not install Django without first activating the Virtual Environment.

pip3 install django

That’s it. Now, let’s see if we can start a Django project. In this case, we use new_django_project as the folder where we store project files, and mydjangosite as the project name, but you can change it to anything you want.

mkdir new_django_project
cd new_django_project
django-admin startproject mydjangosite
cd mydjangosite
python3 manage.py runserver

That’s it, now we have setup Python and Django and we are ready to start building something great!

Challenges and benefits of setting up your home network

In an effort to make my home a more comfortable and enjoyable place, I’ve endeavoured to make the best of technology. I’ve previously posted about setting up my home network, and the experience was enlightening, but at the same time disappointing, as I realized that the current home solutions don’t quite work as well together as I would have liked.

LAN issues

Firstly, despite trying my best to plan out the entire network, it is not possible to plan for every contingency. Unfortunately, one of my LAN connections had issues which can only be attributed to a problem during the cabling. Now that everything is nicely hidden, it is simply not possible to replace / repair it without major hacking and rework… all for just one piece of wire.

The sad part is that this end point was exactly where my desktop is located, and so the most important piece of hardware that requires a LAN connection ended up without, which was truly frustrating for me.

Thankfully, my multiple wireless access points approach worked well, and I simply connected my desktop to my 5G network by getting a USB Wireless Access dongle (because desktops don’t come with that built in usually). I ended up with at least a solid Wireless AC connection for my desktop. Since my UniFi Wireless Access Point sat just outside the door, the results were more than satisfactory.

Having too many devices

I started adding more and more devices to my network, starting with my new Samsung Smart TV. Smart TVs are advanced enough now that they have built in software that covers Netflix, DLNA playback and even a web browser. However, after using it for a while, I discovered that the built in options were less than ideal as I had problem streaming some videos that don’t support mobile browsers. The thing that did work well was Plex streaming, but that required me to keep the Plex server running (and in my case it was my desktop which is not exactly power efficient).

I also had my Mio TV Set Top Box courtesy of Singtel, and it had to be connected directly to me router as there were special settings for IPTV to work. Thankfully, my router came with those settings built in, and I had to use up one of the LAN ports for my router.

I also added a few CCTV cameras, but because I wanted to record what was captured, had to get a device to store what was streamed.

I still have a PS3 in my TV console.

To make it easier to stream stuff, I decided I needed a laptop as a central hub connected via HDMI to my TV.

Despite having 8 LAN ports on my router, I was already maxed out. I had:

  1. One used to connect to my second Wireless Access Point
  2. One reserved for my phone (router settings – can’t be changed if I have #3)
  3. One connecting to Mio TV in the living room
  4. One connecting directly to my living room TV
  5. One connecting to my master bedroom TV
  6. One for my CCTV recording device
  7. One for my PS3
  8. One for my Laptop hidden in the TV console

I had to get a network switch to alleviate the issue of too many cables running from my TV console to router, and free up a few of the LAN ports at my router to make room for future expansions. I haven’t even factored in the LAN points around the house, and some are currently not connected to the router, which is fine for now since it’s not used. I managed to find a TP Link 8-port switch for $35 from Amazon Prime Now, which I think is a pretty good deal, but they, sadly, no longer sell them.

One System to Rule Them All

In my setup, I was trying to make the living room TV the focal point. Whether it was games, watching a show, accessing CCTV footage, all of them required a system to manage, and so the best way to do everything was to have an actual computer connected directly to the TV. Thankfully my company gave me an old laptop, so I set it up as the system in the TV console that could do everything, from streaming dramas and movies to gaming.

Of course, the system was not really powerful and was more so not built for gaming, but thanks to Steam Home Streaming, I could run games from my desktop to the TV, allowing me access to my entire catalogue of Steam games at my TV. Suddenly, I could enjoy many of the X-box to PC releases, and Steam even allowed me to connect a PS4 controller directly, making it a perfect setup! Games like Final Fantasy 7/8, Tomb Raider, Broken Age, Lego Marvel Super Heroes, and the Bioshock series, all played on my couch!

What’s Next

I really wanted my place to have an awesome system to enjoy both solo and with others, and as a gamer, it is obviously exciting for me to be able to build it!

Building a small form factor PC is what I’m looking forward to next to enhance my current setup. Replacing the laptop with a powerful system that runs a GeForce 1080 TI would make the setup VR ready! Plus, 4K resolutions for games and movies are would be no problem!

And then there’s the NAS drive to keep data available on the network. It would lessen the need for my wife to worry about space for her photos and videos.

But until then, at least I know that the time and resources invested into setting up my current network and systems have been worth it. If nothing else, I’m enjoying this aspect of making my house a better home.

Python with Django pointers – Part 2: Apps, MVC(T) and Models

Django Apps

A Django project is typically formed from several Apps, each pertaining to a certain function within a website. Usually, I would expect to create one App for say, site updates and announcements, another App for commercial transactions with a shopping cart and checkout functions, yet another App for a forum etc.

Django comes with a built in Admin Site App, allowing trusted site administrators to quickly create, edit, delete and otherwise manage content. This is considered a common function that is required for just about ANY website, and covers things like management and authentication of users, display and management of forms, input validation, and translating all that into SQL statements for updates into the database. Having this by default really saves a lot of hassle when building a website and is a key feature available in the Django Framework.

Overall, since Apps can be made up of other Apps, it is easy to take a top down approach in designing the overall website functions, as breaking them down into Apps (or smaller Apps within an App) would make it much easier to architect the entire system. The team can then focus on individual Apps which will generate the functionalities required.

Key things for Apps:

  1. Use “python manage.py startapp name_of_app”
  2. Edit “settings.py” at the INSTALLED_APPS line with name_of_app.apps.Name_of_appConfig

Every App typically embodies the MVC structure which is what makes Apps so powerful because it is “self-sufficient” and can thus be replicated and utilized in different projects, with some minor tweaks done to the settings.

The MVC Structure

One of the coolest things about frameworks, is the ability to manage data separately from the logical layer, as well as the presentation layer. The MVC structure really makes things easier as you can split the management of all three layers making it cleaner and faster to make changes.

Edit: I previously stopped at describing Django as using the MVC concept above, but would like to correct it by saying that in there is a difference from a typical MVC structure as opposed to Django’s MVT structure. I think this explains the concept a lot better!

Models

Models are the foundation for data that drives your website. Every piece of dynamic data has to be defined in a model and stored in the database. Being able to manage how data is structured is quite typical in a framework, and Django does this very well by providing migration functions. Changes to the database level structure can be affected by using the “check”, “makemigrations” and “migrate” commands. This ensures consistency while developing where you can choose to update a column of a table for example by simply running these commands.

Of course, Django’s models can also have additional attributes which is on top of the database layer, making them extremely flexible.

Recap

So just a few key things for me:

  1. In models.py of an app, use following syntax
    class Name(models.Model):
    field = models.TypeField()
  2. Add this to Model Class to display human readable objects in models
    def __str__(self):
    return self.field
  3. To add a model to Django Admin, in admin.py, use following syntax
    from .models import Modelname
    admin.site.register(Modelname)
  4. For date, time and numbers data types (non-string), to allow blank fields, use
    field = models.TypeField(blank=True, null=True)

Python and Django pointers – Part 1: Using Virtualenv and Context Syntax

So I’ve decided to try (again) to learn how to code a full Web Application in Python using Django as the framework.

The number of false starts in my endeavour is enough to make me discouraged, but I just can’t totally let it go and I seem to keep coming back to it. Somehow, the desire to actually build something is still there, and I’m just hoping that this time I get somewhere. I’m blogging this experience in part to keep myself in check, and to also document some of my learnings so that I can always come back to it.

I would’ve loved to be coding on a MacBook, but I don’t have one and until I reach a stage where it would be more productive for me to get one, it would make more sense for me to continue using the existing Windows based laptops I have.

First, a few things I’ve (re)learned:

  1. Use pip to install virtualenv in Windows Subsystem for Linux (WSL or Windows Bash). Using Virtual Environment to manage Python Environments and versions are essential to making sure your development environment is consistent. It should essentially be part of your workflow.
  2. Context syntax for multiple variables is as follows: { ‘var_name’: ‘value’, ‘var_name2’: var}
  3. Context syntax for dictionary is as follows: {‘dictionary_name’: {‘var_name’: ‘value’}}
  4. Use “django.shortcuts import render” and then “return render(request, ‘template.html’, {‘context’: bar})”

Ok that’s about as far as I got. Considering it’s only a few hours in, with so much more to go, I really needed to put this down so I can make sure I keep going. At least it’s a start.

Next step is Apps and Migrations within a Project.

Setting up my home network

One of the cool things about doing up your new place, is the opportunity to plan out how you would like your home to be. This applies to the look and feel, but I think also the functionality that you can get out of it. When we purchased our place, I wanted to also try and fix some of the prevailing problems I’ve had ever since I started renting my first room – namely how to minimize running wires around the place. I decided to seriously explore how to go about setting up a home network.

The first thing I did was to think about what I actually needed. I definitely wanted to wire up my desktop directly to my router to minimize latency. I also wanted to make sure I could access the internet anywhere around the house as it was a persistent problem at my previous place. To address these main points, and future proof the house, I decided to try and setup structured cabling at my new place.

Image from Singtel Website
Image from: http://info.singtel.com/personal/internet/broadband-at-home/fibre-broadband-installation/

When I was planning all these out, I tried to find some references or research others with similar experience in Singapore. Most resources online seem to cater more for large houses, or for locals, BTO units which come with structured cabling already more or less setup. I struggled to find points of references for my HDB resale flat. Here are a few things I learned from my experience which will hopefully help others exploring the same path.

The hub

The first thing was deciding on where to place the “hub” or heart of the network. This will be the place where the main router would be setup in the home, and would be where most of the network points end up. A good setup would be something similar to an office network.

I decided on placing my hub near my TV console, keeping the main router exposed for WIFI coverage, but hiding most of the other devices (ONT, switches, power sockets etc) in the built in cabinet. Once this was decided, I had basically decided the “end” point of all my cables to be laid.

Cabling

Image from: http://premiumwires.blogspot.sg/2016/07/cat5e-vs-cat6-vs-cat6e-vs-cat6a-vs-cat7.html

Next is the simple part which you can work with your contractors on: cabling. Most contractors at the bare minimum have Cat6 cables, and although there are even Cat7 cables now, it is not worth the price as the additional isolation for a Cat7 cable isn’t really relevant for home use.

Most contractors charge cables by the number of termination points, rather than by foot run, and as mentioned, the cool thing about doing up your house is you can choose how to conceal and run the cables. In my case, everything is largely nice and hidden, so I only see the RJ45 sockets on my wall.

Termination points

Choosing where and how many points to get depends largely on your needs. You have to look at your layout and determine where the points will be in each room depending on your needs. It is best to have as many points as you can afford, but in my case, I opted for just one point in each room.

There are two end points for each cable, and you will plan for the end points from each room, but the other end should be right at the hub. My contractor initially had RJ45 female points for each of the rooms, and gave me male points at the other end, which I was not too happy about.

While it is definitely “easier” to just plug all the male points into the router / switch, the fact remains that I have that moving cable running through the house concealed, and if that moving part were to spoil (unlikely I know but I didn’t want to take the chance) I could not re-run the wire unless I was to hack the concealed ceiling and replace it.

I made some noise and they eventually replaced the male points with a wall mounted RJ45 female plate which housed 4 points each. This was fixed to the wall, making the chance of each point failing due to cable movements much lower. I just needed to get a regular Cat6 patch cable to connect each of the points to my router, and I was set!

WIFI considerations

Another key thing to think about your setup is the kind of devices you will be using in your home. If you have more devices that will be connected by WIFI, and they are spread out in the house, then you will need to cater for them.

In a city like Singapore, it is unfortunate that your WIFI signal will get constant interference from other WIFI devices. Due to how saturated the WIFI signals are, it seems that there will always be “dead spots” in the house with a standard WIFI router. Of course, you could opt for a wireless mesh network solution like EeroOrbi or if you can get a parallel import, Google Wifi, but that doesn’t help to reduce the traffic.

Instead, I would highly recommend you get an additional access point (unless you are staying in a studio sized unit). Every WIFI device will then connect to your network via the access point(s), preserving the bandwidth of communicating between your main router and the access point. I did this by running an additional data point to the ceiling where I wanted to place my other access point.

Router selection

The new routers from most service providers are pretty good, although they lack the flexibility and configuration options that some power users might need. Still, as long as you are just intending to have a decent connection and are not looking to setup a VPN, remote file server etc just stick with the router provided. I use Singtel and the new wireless AC router works just fine.

A key thing note is the number of ports you might need for your cables. Most routers come with up to 4 ports, and if one of them is used for your secondary Wireless Access Point (WAP), then you are left with only 3 which you could use to connect to the other rooms in your unit. If you also want to connect your TV / Game Console / NAS / HTPC via cables, then you would likely need to invest in a switch. This is the main reason you would want to plan out the kind of devices you would like to use.

ASUS routers can be quite expensive, and there is one model that has up to 8 ports (RT-AC88U). Asus routers in general are not too difficult to maintain and there is a lot of support available, but I would say most users would not need to go there unless you have a specific need for your network.

You can also explore Ubiquiti products, which is very powerful, scalable and provides the most options, but it is pricey and typically meant for business / commercial use, so it may not be worth it for home use. That said, they do have a powerful WAP that is affordable and can save you the hassle of an additional power socket, because they make use of Power Over Ethernet (POE) which allows your data cable to also power the WAP. I personally went for the Unifi AP AC Lite which came with POE adapter which makes the WAP positioning much cleaner.

Summary

Overall, while I am not the most network savvy person, I am quite happy with how my network is now setup and can kiss goodbye to cables running across my house. Having most devices hooked up by cables ensures that I do not get as much signal interference, and gives you more options to expand your network usage. As we are moving towards the age of the Internet of Things, having a better connection at home would be very helpful as more and more smart devices can be effortlessly connected to your network.

If you ever want to make your home somewhat smarter, and you have the opportunity to do up your place, then consider the points that I listed above. Or, drop a comment below with your questions and I will see if I can help.

Integration of the Web

Image by OSTI {http://www.osti.gov}

If you are like me, you would be sick of having to sign up with an email, username and password for every new web service that you would like to consume. It’s also a pain because almost all of these services require a verification of your email as part of the process. I am thankful that more and more services are adopting single sign on, allowing you to sign up for their services using either your Twitter, Google or Facebook accounts. By doing so, it really saves me the hassle of that whole process since I’m likely to be already signed on to some/all of these accounts. You just click Sign in with Google, authorize the web service, and voila, you have just established a link between Twitter, Google or Facebook to this web service.

Welcome to the integration of the Web!

Historical context

The Web has evolved from being a huge encyclopedia of information, to now a medium for services to be delivered to every corner of the world. What used to display only static webpages, now delivers fully interactive applications allowing everyone to communicate, attend classes, conduct financial transactions, organize and host meetings, and provide interactive entertainment and more. With the smartphone, this has extended even further, transforming it into your personal trainer, navigator, organizer, and informer, anywhere, anytime. We call this new marketplace of services “the cloud”, where we can consume web provided services such as email and office productivity suites, all with just a web browser.

Image by prn.fm {http://www.prn.fm}
It is inevitable that the cloud, with all the services available to anyone and everyone, would touch many areas of our lives. This diverse ecosystem raises an interesting conundrum: how do we manage all of them in our online interactions and transactions? I believe that as the market is made more diverse and complex, we will eventually need to reduce the complexity of having so many different services by collapsing into a few focal points in the ecosystem, simplifying and unifying where possible. Right now, that appears to be the likes of Twitter, Google and Facebook.

Expanding the idea
The integration is not just limited to logins. Web services enhance their capabilities by integrating with other web services. For example, my very first encounter with web service integration was when I connected my Twitter account with Facebook, allowing me to update both simultaneously by posting on Twitter. This essentially reduced my maintenance and usage of two different web services to one.

Image by AVLView {http://www.avlview.com}
How this is done, is through what we call Application Program Interfaces (APIs). Both Twitter and Facebook have built external facing “hooks”, which any developer can make use of to leverage its services, and it is in the web services best interest to build these as it further ties down users onto their platform. By opening and allowing everyone to easily post and “like” things Facebook ensures it does not go the way of MySpace and Friendster. After all, if the service is already so entrenched into your life, it is unlikely you will ever think of migrating to another platform.

APIs really make the web much easier to manage and navigate as it brings together web services to make them work better and more efficiently. There are even services like IFTTT that serve mainly to do this.

Conclusion

As I type this, I get excited about the prospects of the future. As more web services hit the web, they are going to be tied and integrated to some other services we are using, making the web seem like it is evolving and expanding features rather than trying to get you to go with “new” stuff. We would start seeing new services as adjustments of usage rather than whole new adoptions, and it makes the learning curve less steep. I look forward to all the cool new stuff that 2015 and beyond will bring to make our web experience that much sweeter.

Efficiency and Productivity

lifehacker_logoI always love to explore how things can be done “better”, and being able to find a method, option or approach that increases efficiency, productivity or just making things easier is something that I’m always excited about. This is the main reason why sites such as Lifehacker remain as my favourite websites on the Internet. It is interesting to me to find and learn how to do things better, because I believe life can be lived so much better when things are simpler and more convenient, especially difficult or tedious tasks. This particular tendency is probably also the reason why I chose computing / IT, as I feel a great satisfaction in addressing difficult / complex tasks by simplifying it using technology.

When I first started exploring, most of these were computer related, because computers are logical, and there are usually quite a number of ways to automate instructions or increase the speed at which things are done. Something as simple as learning keyboard shortcuts (Ctrl+C, Ctrl+V) for example, have significantly improved the speed at which I work on the computer, and while I still sometimes use the right-click method, it is significantly easier to use keyboard shortcuts when I am handling big amounts of copies and pastes.

Considering the amount of time I spend in front of the computer (both at work and for leisure) I have saved a lot of time just using these “hacks”. It’s also allowed me to accomplish more, because if I had to manually do a lot of repetitive actions that are simply too tedious, I might actually give up and choose NOT to do it. A good example would be sorting out my music library. For the longest time, I had my library grow unchecked and I had duplicates, spelling errors, funny characters in the song title and files with wrong labels. Only when I found out about the available tools to help me automate this did I actually decide to start doing it. It’s a whole lot cleaner now and it’s a lot easier for me to find a song I want than ever before.

smartphones_rectOf course, now that mobile devices and smartphones are here, there is an even bigger scope for such “hacks”. When I first got my smartphone (an iPhone 3GS), it was like my ultimate device, and I used it as my library for books, my MP3 player, news reader, instant Google device, email client, camera, gaming device, and of course my phone. Naturally, it has expanded somewhat and I am now using it also for banking, making payments, booking flights, storing boarding passes or check in information, as a work device, an exercise tracker and more. The scope of what a smartphone can do increases every single day, and it seems that we can consume humongous amounts of information each day. Having so much at our fingertips is great, but only when we focus it in the right direction will we get the reap the maximum benefits, especially if we want improved efficiency and productivity in our lives.

Looking for ways to make life easier, faster, better, or in other words, to “hack” a certain area so we get better results than the conventional method, whatever that may be, is something I do with a passion, and when I find a particularly interesting “hack”, I like to share it with others in the hopes that they might also reap and enjoy its benefits. I’ve probably touched on this before, but I’ve decided to open up a new section here to discuss and share some of the really cool stuff. It’s going to be exciting!