Challenges and benefits of setting up your home network

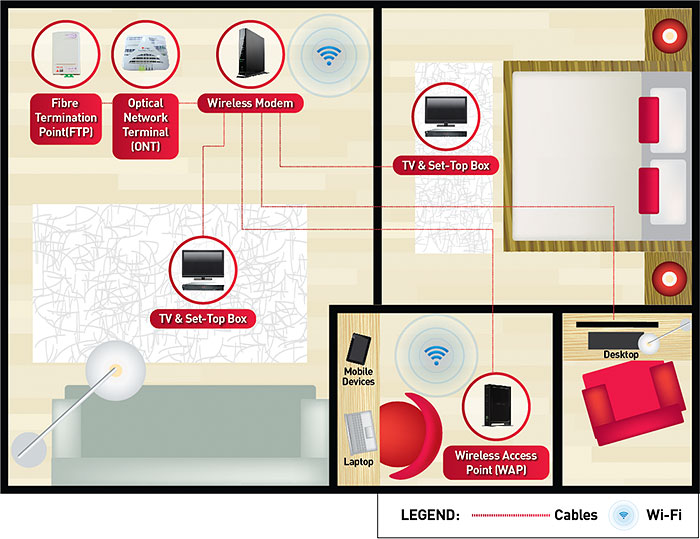
In an effort to make my home a more comfortable and enjoyable place, I’ve endeavoured to make the best of technology. I’ve previously posted about setting up my home network, and the experience was enlightening, but at the same time disappointing, as I realized that the current home solutions don’t quite work as well together as I would have liked.

LAN issues

Firstly, despite trying my best to plan out the entire network, it is not possible to plan for every contingency. Unfortunately, one of my LAN connections had issues which can only be attributed to a problem during the cabling. Now that everything is nicely hidden, it is simply not possible to replace / repair it without major hacking and rework… all for just one piece of wire.

The sad part is that this end point was exactly where my desktop is located, and so the most important piece of hardware that requires a LAN connection ended up without, which was truly frustrating for me.

Thankfully, my multiple wireless access points approach worked well, and I simply connected my desktop to my 5G network by getting a USB Wireless Access dongle (because desktops don’t come with that built in usually). I ended up with at least a solid Wireless AC connection for my desktop. Since my UniFi Wireless Access Point sat just outside the door, the results were more than satisfactory.

Having too many devices

I started adding more and more devices to my network, starting with my new Samsung Smart TV. Smart TVs are advanced enough now that they have built in software that covers Netflix, DLNA playback and even a web browser. However, after using it for a while, I discovered that the built in options were less than ideal as I had problem streaming some videos that don’t support mobile browsers. The thing that did work well was Plex streaming, but that required me to keep the Plex server running (and in my case it was my desktop which is not exactly power efficient).

I also had my Mio TV Set Top Box courtesy of Singtel, and it had to be connected directly to me router as there were special settings for IPTV to work. Thankfully, my router came with those settings built in, and I had to use up one of the LAN ports for my router.

I also added a few CCTV cameras, but because I wanted to record what was captured, had to get a device to store what was streamed.

I still have a PS3 in my TV console.

To make it easier to stream stuff, I decided I needed a laptop as a central hub connected via HDMI to my TV.

Despite having 8 LAN ports on my router, I was already maxed out. I had:

  1. One used to connect to my second Wireless Access Point
  2. One reserved for my phone (router settings – can’t be changed if I have #3)
  3. One connecting to Mio TV in the living room
  4. One connecting directly to my living room TV
  5. One connecting to my master bedroom TV
  6. One for my CCTV recording device
  7. One for my PS3
  8. One for my Laptop hidden in the TV console

I had to get a network switch to alleviate the issue of too many cables running from my TV console to router, and free up a few of the LAN ports at my router to make room for future expansions. I haven’t even factored in the LAN points around the house, and some are currently not connected to the router, which is fine for now since it’s not used. I managed to find a TP Link 8-port switch for $35 from Amazon Prime Now, which I think is a pretty good deal, but they, sadly, no longer sell them.

One System to Rule Them All

In my setup, I was trying to make the living room TV the focal point. Whether it was games, watching a show, accessing CCTV footage, all of them required a system to manage, and so the best way to do everything was to have an actual computer connected directly to the TV. Thankfully my company gave me an old laptop, so I set it up as the system in the TV console that could do everything, from streaming dramas and movies to gaming.

Of course, the system was not really powerful and was more so not built for gaming, but thanks to Steam Home Streaming, I could run games from my desktop to the TV, allowing me access to my entire catalogue of Steam games at my TV. Suddenly, I could enjoy many of the X-box to PC releases, and Steam even allowed me to connect a PS4 controller directly, making it a perfect setup! Games like Final Fantasy 7/8, Tomb Raider, Broken Age, Lego Marvel Super Heroes, and the Bioshock series, all played on my couch!

What’s Next

I really wanted my place to have an awesome system to enjoy both solo and with others, and as a gamer, it is obviously exciting for me to be able to build it!

Building a small form factor PC is what I’m looking forward to next to enhance my current setup. Replacing the laptop with a powerful system that runs a GeForce 1080 TI would make the setup VR ready! Plus, 4K resolutions for games and movies are would be no problem!

And then there’s the NAS drive to keep data available on the network. It would lessen the need for my wife to worry about space for her photos and videos.

But until then, at least I know that the time and resources invested into setting up my current network and systems have been worth it. If nothing else, I’m enjoying this aspect of making my house a better home.

Setting up my home network

One of the cool things about doing up your new place, is the opportunity to plan out how you would like your home to be. This applies to the look and feel, but I think also the functionality that you can get out of it. When we purchased our place, I wanted to also try and fix some of the prevailing problems I’ve had ever since I started renting my first room – namely how to minimize running wires around the place. I decided to seriously explore how to go about setting up a home network.

The first thing I did was to think about what I actually needed. I definitely wanted to wire up my desktop directly to my router to minimize latency. I also wanted to make sure I could access the internet anywhere around the house as it was a persistent problem at my previous place. To address these main points, and future proof the house, I decided to try and setup structured cabling at my new place.

Image from Singtel Website
Image from: http://info.singtel.com/personal/internet/broadband-at-home/fibre-broadband-installation/

When I was planning all these out, I tried to find some references or research others with similar experience in Singapore. Most resources online seem to cater more for large houses, or for locals, BTO units which come with structured cabling already more or less setup. I struggled to find points of references for my HDB resale flat. Here are a few things I learned from my experience which will hopefully help others exploring the same path.

The hub

The first thing was deciding on where to place the “hub” or heart of the network. This will be the place where the main router would be setup in the home, and would be where most of the network points end up. A good setup would be something similar to an office network.

I decided on placing my hub near my TV console, keeping the main router exposed for WIFI coverage, but hiding most of the other devices (ONT, switches, power sockets etc) in the built in cabinet. Once this was decided, I had basically decided the “end” point of all my cables to be laid.

Cabling

Image from: http://premiumwires.blogspot.sg/2016/07/cat5e-vs-cat6-vs-cat6e-vs-cat6a-vs-cat7.html

Next is the simple part which you can work with your contractors on: cabling. Most contractors at the bare minimum have Cat6 cables, and although there are even Cat7 cables now, it is not worth the price as the additional isolation for a Cat7 cable isn’t really relevant for home use.

Most contractors charge cables by the number of termination points, rather than by foot run, and as mentioned, the cool thing about doing up your house is you can choose how to conceal and run the cables. In my case, everything is largely nice and hidden, so I only see the RJ45 sockets on my wall.

Termination points

Choosing where and how many points to get depends largely on your needs. You have to look at your layout and determine where the points will be in each room depending on your needs. It is best to have as many points as you can afford, but in my case, I opted for just one point in each room.

There are two end points for each cable, and you will plan for the end points from each room, but the other end should be right at the hub. My contractor initially had RJ45 female points for each of the rooms, and gave me male points at the other end, which I was not too happy about.

While it is definitely “easier” to just plug all the male points into the router / switch, the fact remains that I have that moving cable running through the house concealed, and if that moving part were to spoil (unlikely I know but I didn’t want to take the chance) I could not re-run the wire unless I was to hack the concealed ceiling and replace it.

I made some noise and they eventually replaced the male points with a wall mounted RJ45 female plate which housed 4 points each. This was fixed to the wall, making the chance of each point failing due to cable movements much lower. I just needed to get a regular Cat6 patch cable to connect each of the points to my router, and I was set!

WIFI considerations

Another key thing to think about your setup is the kind of devices you will be using in your home. If you have more devices that will be connected by WIFI, and they are spread out in the house, then you will need to cater for them.

In a city like Singapore, it is unfortunate that your WIFI signal will get constant interference from other WIFI devices. Due to how saturated the WIFI signals are, it seems that there will always be “dead spots” in the house with a standard WIFI router. Of course, you could opt for a wireless mesh network solution like EeroOrbi or if you can get a parallel import, Google Wifi, but that doesn’t help to reduce the traffic.

Instead, I would highly recommend you get an additional access point (unless you are staying in a studio sized unit). Every WIFI device will then connect to your network via the access point(s), preserving the bandwidth of communicating between your main router and the access point. I did this by running an additional data point to the ceiling where I wanted to place my other access point.

Router selection

The new routers from most service providers are pretty good, although they lack the flexibility and configuration options that some power users might need. Still, as long as you are just intending to have a decent connection and are not looking to setup a VPN, remote file server etc just stick with the router provided. I use Singtel and the new wireless AC router works just fine.

A key thing note is the number of ports you might need for your cables. Most routers come with up to 4 ports, and if one of them is used for your secondary Wireless Access Point (WAP), then you are left with only 3 which you could use to connect to the other rooms in your unit. If you also want to connect your TV / Game Console / NAS / HTPC via cables, then you would likely need to invest in a switch. This is the main reason you would want to plan out the kind of devices you would like to use.

ASUS routers can be quite expensive, and there is one model that has up to 8 ports (RT-AC88U). Asus routers in general are not too difficult to maintain and there is a lot of support available, but I would say most users would not need to go there unless you have a specific need for your network.

You can also explore Ubiquiti products, which is very powerful, scalable and provides the most options, but it is pricey and typically meant for business / commercial use, so it may not be worth it for home use. That said, they do have a powerful WAP that is affordable and can save you the hassle of an additional power socket, because they make use of Power Over Ethernet (POE) which allows your data cable to also power the WAP. I personally went for the Unifi AP AC Lite which came with POE adapter which makes the WAP positioning much cleaner.

Summary

Overall, while I am not the most network savvy person, I am quite happy with how my network is now setup and can kiss goodbye to cables running across my house. Having most devices hooked up by cables ensures that I do not get as much signal interference, and gives you more options to expand your network usage. As we are moving towards the age of the Internet of Things, having a better connection at home would be very helpful as more and more smart devices can be effortlessly connected to your network.

If you ever want to make your home somewhat smarter, and you have the opportunity to do up your place, then consider the points that I listed above. Or, drop a comment below with your questions and I will see if I can help.

Point and Click Adventure Games

Computer Gaming has been in my life from as far back as I can remember. I started playing them at my cousin’s place each time we visited, and especially in this part of the world, very few people had computers. The Internet was non-existant at the time. The entertainment value of games was not in the graphics, but largely in the story and gameplay interaction. I remember sitting behind my cousin as he played through Kings Quest, unveiling the story and solving puzzles along the way. I felt that was really cool!

Lucasarts
Lucasarts
I think that was the start of my own journey with point and click adventure games. I fondly remember Lucasarts classics like the Monkey Island series, Full Throttle, Indiana Jones and the Fate of Atlantis, Sam and Max Hit the Road, and Day of the Tentacle, Sierra classics like the King’s Quest series, Torin’s Passage, and even Phantasmagoria, at the time requiring a whopping 7 CDs. The dialogue was witty, and the gameplay had a puzzle solving approach which brought hours of entertainment. I remember playing Robin Hood, trying to win the tournament splitting an arrow, and having Indiana Jones find Atlantis – these are some of the moments that defined my early computer game experience.

Over the past 10 years or so however, the genre has seemingly faded into the background, with some occasional gems like The Longest Journey and Syberia giving us a taste of how fun and witty story telling can be captivating and thoroughly enjoyable. However, it hasn’t been a genre that has gotten a lot of attention. Strategy games, RPGs, FPS, and even simulation games seemed to be doing a much better job drawing players and retaining them. Lucasarts all but stopped investing in the genre, and Tim Schaffer, one of the designers of much of the classics at Lucasarts left forming Double Fine Productions back in the year 2000. Other game designers also left Lucasarts and formed Telltale Games, taking over releasing further episodic titles of titles such as Sam and Max and Monkey Island as well as some other game adaptations.

Double Fine Adventure
It was a struggle initially, as these new developers and publishers fought to release their games in a time when the market seemed to have eyes only for RPGs and FPSs. Story telling in games appeared to have fallen by the wayside. However, thanks to initiatives such as Kickstarter, things may be looking up. Also, in this age where every IP gets milked for all its worth, new and exciting ideas and IP are uncommon and present a risk that these game developers and publishers face. However, there is a huge demand in the market for fun original ideas, and what better way to establish this than with games that tell a story with wit, humor and character development.

Recently, I’ve had the privilege of playing Deponia and The Book of Unwritten Tales, both fun and interesting releases that make me hope that the genre is again on the rise. Kickstarter has given Double Fine a breath of life, and I hope my contribution to it will further contribute to the revival of this genre. I’m excited for it!